Updating WebScan
This chapter covers the different ways using in which the WebScan application can be updated and includes the following sections:
u Install Updates Using WebScan
u Manually Update WebScan Using the Installation Program
There are two ways in which you can see if there are updates for the WebScan application.
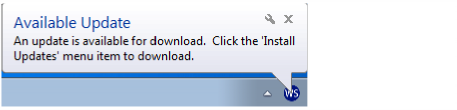
l WebScan Notifications - When updates are available, a pop up notification is shown to the user.
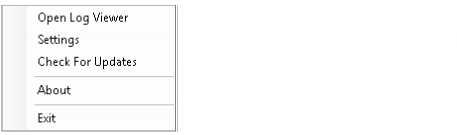
l Manually Check for Updates - To manually check if an update is available, click on Check For Updates from the system tray menu option.
A WebScan is up-to-date window is displayed when no updates are available.

This section covers how to install updates with the WebScan application. WebScan checks for new updates at startup and every six hours thereafter.
u Install Updates with WebScan
1.If you haven't already done so, check if new updates are available.
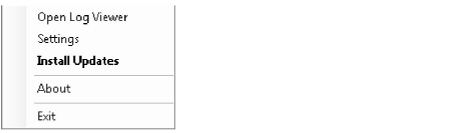
2.Right-click on the WebScan icon from the system tray menu.
3.Click on Install Updates.
|
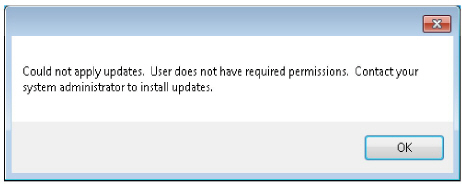
To install the latest updates, you must be logged on as a Windows administrator or manually select WebScan to Run as Administrator. |
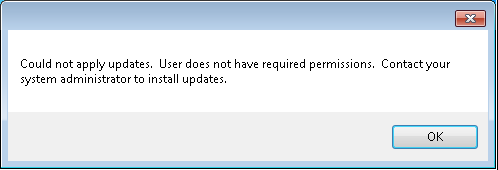
A message is displayed in case the user does not have appropriate permissions to apply updates. Click OK.
4.The update progress (which includes downloading the updates) can be viewed by looking at the WebScan icon system tray menu.
|
Installation will begin after the downloads are complete. |
5.After the updates are successfully installed, WebScan will automatically start and is displayed in the system tray menu.
Manually Update WebScan Using the Installation Program
This section covers how to manually update the WebScan application.
* Note: This method is not recommended and should only be used for troubleshooting purposes if the system tray method fails.
u Manually Update WebScan with the Installation Program
1.Run the WebScanCapture_Setup.msi to open the Welcome to the WebScan Setup window.
2.Click Next to open the Select Installation Folder window.
3.If you want to select where to install the software, click Browse and choose the location; otherwise keep the default location. When finished, click Next to open the Confirm Installation window.
4.To begin installation, click Next.
5.When notified that the installation process is complete, click Next.
6.Depending on the workstation’s User Account Control (UAC) setup, you may be prompted with a confirmation window. If so, click Yes to continue.
7.If the application is still running, you will be prompted with a confirmation window to either close the application and click Try Again or click Continue so that the installer continues the installation and replaces those files when you restart the system or Exit Installation.
|
By clicking Continue, you can skip to the next step but a system restart will be required. |
8.After the installation finishes, click Close.
When the installation successfully completes, WebScan will automatically start and is displayed in the Windows Notification Area.